The Basics – Named ranges
This is a short post about a tiny, but useful feature. Naming a range is, simply put, the ability to give a name to one of several cells. This name can then be used instead of the alpha numeric reference to the cell.
Named ranges can be used in formulas and thus, become helpful when building complex systems. They also allow you to create custom functions.
How to create a named range
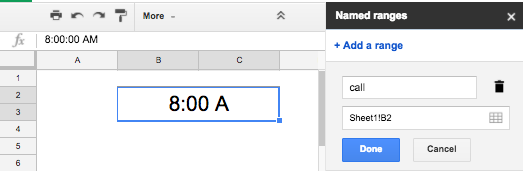 Select a cell or range of cells, then go to Data > name ranges. In the menu bar to the right, enter any name you want. It cannot contain spaces. Also, if you are dealing with merged cells as in this example, make sure to reference only the first cell of the merged range (here, it’s cell B2 instead of B2:C3).
Finish by clicking “Done”.
Using a named range in a formula
In my example, I named my range “call”. With that, I intend to refer to this cell and add or substract time to create individual call times.
As I’ve mentioned above, named ranges can be used in formulas. I have two crew members on my call sheet. John will have a call time of 8am, and Jane will have a call time of 8:30am. For Jane, i’ll use the built in TIME function to add 30 minutes to the call time above. Here are the formulas I’m using:
 John: =call
Jane: =call+time(0,30,0)
John: =call

Jane: =call+time(0,30,0)
And that’s it! Named ranges are great because you can use them on any tab of your document, which makes it a lot easier to reference a cell.
Creating a custom function
Typing “time(0,30,0) is a bit time consuming. Since we mostly deal in increments of 15 minutes (or 6 minutes for union shows) in the industry, wouldn’t it be easier to just type “Time015”, or “Time030”?
Disclaimer: there is a more elegant way to do this by using JavaScript in the built in script editor. But, I’d rather stick to the basics and do it with the tools we’re learning to use.
To create our custom time function, we simply need to enter the amount of time we need in a cell, then give this cell a name. Let’s build a table for that:
 Remember, you can type the first two increments, then drag the list down and the list will write itself.
I didn’t go past 6h because “Call time + 6h” is “lunch”. I’ll use the named range tool to give this name to the cell containing the lunch time. And if anyone’s call is in the afternoon, I’ll do “Lunch + time”.
Right now, you should be able to see if the system works. If you type “=call+E3”, you should get “8:15”.
So let’s finish this by naming each time increment appropriately. That’s the annoying part of the build. You need to select each cell and name it as we explained in the previous section.
0:15 should be named “time015”
0:30 should be named “time030”
0:45 should be named “time045”
1:00 should be named “time100”
etc…
Go back to cell C6 and type:
=call+time030
Tadaa! Think about all the time saved on all future call sheets!


0 Comments